Pages

Showing posts with label Spring Maples. Show all posts

Tuesday, February 22, 2011

Wild, Wonderful Winter Wonderland

Today's Lesson: never trust a Rodent.  Good Old "Prostitution Phil" (don't ask) predicted an early spring, and last Friday when the temperatures were topping 70, it started to look like he might be right! However, as I sit here looking out my window at over 6" of snow, that groundhog should just be glad that even West Virginians don't consider Groundhog Goulash a delicacy.

The funny thing is, I'm one of those crazy people that usually really likes snow, but after being able to run outside in shorts last week, even I was less than thrilled with the forecast. But hey, if you can't beat it, photograph it!


Monday, December 27, 2010

Christmas at Spring Maples the 2010 Edition: Part 3

So I lied, I'm sorry. I got wrapped up (literally) in Christmas business, and barely even had a chance to check my email! Hope everyone had a Very Merry Christmas--I know I did! Some of my gifts included a crêpe pan, Peugeot salt & pepper grinders and Dorie Greenspan's Around My French Table. I have yet to try a Dorie Greenspan recipe that I haven't loved, so as I cook my way through the book I'll be sure to share my experiecnes. I'm also anxious to attempt crêpes, and as always I'll post my failures along with my [hopeful] successes.

Below are the rest of the Christmas pictures, I really have nothing to say other than NEVER turn me loose with a staple gun and extra lights after a few glasses of wine :)


I also decided to do a mini-photoshoot with Schatze before I headed out for the Christmas Eve Candle light service. Here are some of the outtakes :)

Thursday, December 23, 2010

Christmas at Spring Maples the 2010 Edition: Part 2

 As mentioned in my previous post, Christmas 2009 was my first Christmas as the mistress of Spring Maples. I was a brand new home-owner and feeling awfully advantageous, so I decided to tackle two full-sized, live Christmas trees. It was a perfect plan--I could use my ornaments on one tree, my grandmother's on the other, and a tree in both front windows would make for symmetrical lighting from the exterior.

This year, I was not so motivated. I HATE putting the lights on trees more than anything, and the thought of putting lights on two trees was more than I could handle. So, since I was only doing one tree this year, I wanted a REALLY BIG ONE. I went to Simmon's Tree Farm in Bedington and found this doozy (pictured right): think it's big enough?

I also felt inclined to saw it down myself. Let's just say Paul Bunyanain't got nothin' on me!

My mom helped me drag the tree to the truck (hijacked from the dear little brother), and one of the tree farm workers helped us strap it in the bed.

Now if there's one thing I've learned about myself, it's that every project I tackle is always an adventure (read: disaster). Less than a mile from the tree farm I was cruising along at a whopping 30MPH, and next thing I know the tree was flying out the back of the truck. OOPS! Fortunately, the only person behind me was an incredibly awesome Frontier employee who not only had enough sense to keep his distance, but he stopped and helped us re-secure the tree back into the truck. Ten miles and 20 minutes later, we finally made it home; however, the fun wasn't over.

Once I started trimming the bottom branches off, I quickly realized that the tree was too big for any of the tree stands I had around the house. I sent Mom on a mission for a bigger one, and I continued to hack away at the bottom of the tree. 
 
She returned with a jumbo tree stand, which fit; however, the trunk of the tree was soft, so instead of supporting the tree, the screws from the stand just kept digging into the trunk. Mom held the tree upright while I placed a frantic call to my grandfather. He came down right away with several pieces of wood, which were just what we needed!

Truth: I'm a little late on this post. I've had the tree up since the first week in December, but better late than never, right? As painful as the tree-getting experience was, putting the lights on was physically even more painful (it's a Scotch Pine, I'm heading to Bliss after this post to try and salvage my hands). BUT, the tree is lit, decorated, and Tiger has "watered" it more time than I even want to discuss.

Tonight or tomorrow I'll conclude my Christmas mini-series with the grand final--everything is all lit up! I'm pretty sure I'm sending the entire electric company on va-cay this year.

Tuesday, December 7, 2010

Christmas at Spring Maples the 2010 Edition: Part 1

Front Window Wreaths Awaiting Their Hanging
While I spent many a Christmas as my grandparents' guest at Spring Maples, 2009 was my first Christmas as Mistress of Spring Maples aka Decorator in Chief (DOC). My first order of business as DOC was to stray from traditional Red and Green holiday hues, channel my inner Lilly Pulitzer, and deck the halls in Pinks and Greens.

My first purchase was this a-mazing wreath that I custom-ordered from Flower's Unlimited in Martinsburg, WV. I'm normally not much on artificial greenery, but do you really think I could buy a wreath like this and only keep it for one Christmas? I think not. The picture at right was taken last week, so as you can see it stored beautifully! (P.S. I also totally love that it matches my front door :) )

Last year, I used some tinsely wreaths from Target on the rest of the front windows, but for $1 a piece they barely made it through December. This year, I decided a little DIY project was in order, so I purchase 3 plain evergreen wreaths from A.C. Moore and those awesome pull out bows (they're only a few $ and all you do is pull the strings et voilà: perfect bow!), snagged some Christmas balls I bought at Wally World last year, and made my own wreaths!

And last, but certainly not least, these giant Christmas balls. I found these on post-Christmas clearance at Target and instantly knew their fate. I'm quite please with how they look; however, on a windy day they blow around and make a terrible bonking noise. The first time it happened was in the wee hours of the morning; the dog and I both thought there were bad guys after us.

As noted in the title this is merely the first post in my Christmas at Spring Maples series. Stay tuned for adventures in Tree-Trimming.

Saturday, November 20, 2010

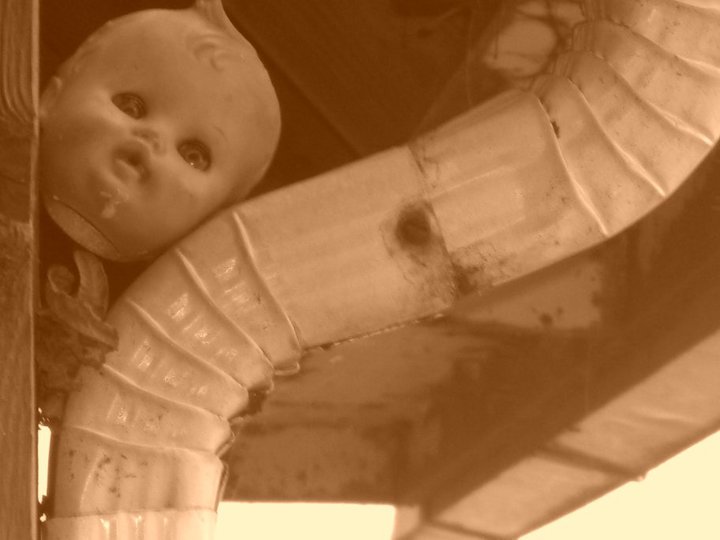
Valley of the Dolls


Ghosts, poltergeists, plumbing--don't let anyone try and tell you that owning an old house isn't scary. When I bought my grandparent's house, it was, well, full. As I've sorted through everything from 1960's Harper's Bazzars to 1960's homework assignments, I've found some pretty cool items and some creepy ones as well--namely the dolls.

Some are missing clothing, others  limbs, but the strangest part are where they're found. It started as a joke when one of my aunts put a 3 foot doll in an attic window and almost gave the Fedex guy a heart attack. From that point onward, you never knew where a doll, or doll head would appear: there was even one in the shower once!

Over the past year, I decided to document the dolls via photos. As in golf, all shots were played where they lie.


 So, who's ready for a sleepover???

Tuesday, May 5, 2009

Mini Kitchen Makeover=New Ceiling Fan and Pink Cabinets

I don't quite have the funds yet to totally overhaul my kitchen, but I figured there had to be SOMETHING I could do in the interim do spruce things up.

As I sat staring at the orangish-brown cabinets, I remembered that I still had 3/4 of a can of "cherry blossom" aka pink stain left from an earlier project. Hmmmmm...I had always planned on painting the walls an apple green, and my Kitchen Aid appliances are all pink, so why not go all out with the pink and green kitchen concept and have pink cabinets too?!

I immediately got to work:

Taking it all apart
I took all the doors off and removed all hardware, placing the hardware in Ziploc baggies for safe keeping. Then came the sanding, and sanding, and sanding some more. Whatever had been on those cabinets was an absolute nightmare to remove!

Sanding
After almost wearing out my sander and about 5 million sheets of sandpaper later, I decided to try a varnish remover on the doors (obvi this part was done outside). At first I followed the instructions: dabbing a cloth, rubbing in circles, blah blah blah, it's supposed to come right off--yeah right. I decided that just pouring the remover on was a much better method. I poured some on, sat back ,and watched the varnish bubble up. After that I just took a scraper and removed the "skin" but don't worry, there was still MORE sanding to do ever after that.

***I dont recommend this project to anyone who doesn't like sanding***

Staining
Old socks work great for applying stain! You'll definitely want to wear rubber gloves for this, or else you'll end up with a lovely stain covering your hands (I still have pink stain under my fingernails). I ended up doing 3 coats of stain and then 2 coats of the semi-gloss clear coat: oh yeah and make sure everything has dried before your next coat. Also note, that "drying time" varys with temperature and humidity.

Putting it all together
I decided on one of my 50 trips to Home Depot for sandpaper, that I wanted new hardware--easy enough right? One problem, the holes for my old handles were slightly off from my new handles. Luckily my grandfather was on hand to help with the rather tedious task of measuring and drilling new holes. Putting the actual cabinet doors on, was also a bit more difficult than I'd estimated. Since the cabinets are old (early 1900's) and handmade, things don't exactly fit as nicely as you'd like them to. I had to unscrew several doors, and drill new holes just to get everything back to how it had been.

Et Voila!
(that wallpaper is on the list, for the next phase of the kitchen makeover)


Let's not forget my new fan!

Ceiling fans are actually very easy to install if where you're putting is already wired for a fan. Note, that I highly recommend buying a fan without a light and doing your own light kit: you have SO many more options, and they're much better than the ones that come with most fans.
I must admit that for awhile, this whole kitchen project was reminiscent of Humpty Dumpty; I thought I was going to need all the kings horses and definitley all of his men. However, once I realized that things weren't going to happen overnight, I took my time, did it all (almost) by myself, and I couldn't be happier with my pink cabinets!
P.S. I love colored stain, and I've learned that a $14 can of stain can last you, a washstand, 3 picture frames, your kitchen cabinets, and you'll still have some left over!!!

Sunday, December 7, 2008

Home Renovation: Where to begin?

So I recently became a homeowner; I bought my grandparent's house in West Virginia! I hope to have some pics of the actual house up soon. I'm super excited about the house, but there's a whole lot of work to be done. I hope to do a lot of it myself, which should prove entertaining to say the least. Obvi, I'll document this renovation project so y'all can learn some tips and laugh at my mistakes.


Also, the purchase of this new house means I can have a real garden!!!


Anywho, before I get to start the "fun" stuff like painting and decorating, all the wiring needs to be updated. Don't you agree?